# 0. Excel Upload 시작하기 전
# RAP에서는 Excel Upload을 할 경우에는 Extension을 해야 Excel Upload가 필요로 한다.
# 또한 기본적인 CRUD가 되어있는 프로그램이 완성이 되어있어야 한다.
# 프로그램에 대한 내용은 간략하게 하고 넘어가겠다.
# 여기서 Draft 기능은 사용하지 않는 걸로 하자.
( 사용 시 바로 저장이 안되는 이슈가 있기 때문에 Draft 기능 비활성화 하자 )
# Table -> Scarr Table을 본 따서 만들었다.
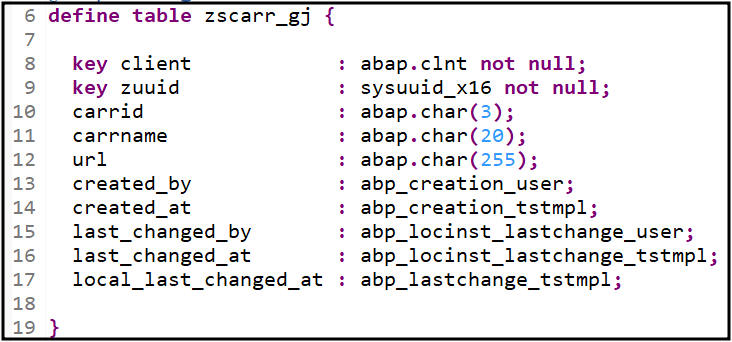
  key client            : abap.clnt not null;
  key zuuid             : sysuuid_x16 not null;
  carrid                : abap.char(3);
  carrname              : abap.char(20);
  url                   : abap.char(255);
  created_by            : abp_creation_user;
  created_at            : abp_creation_tstmpl;
  last_changed_by       : abp_locinst_lastchange_user;
  last_changed_at       : abp_locinst_lastchange_tstmpl;
  local_last_changed_at : abp_lastchange_tstmpl;
# 프로그램
# Extension을 하기 위해서는 필요한 것이
- SAP CAP
- SAP BTP Trial
- UploadSet Control
- XlSX JS, Ui5-tolling-Modules
- ODATA V2 필수!
자 시작해 보자.
밑에 블로그 참고하였다.
https://blogs.sap.com/2022/01/19/excel-upload-using-rap-part-1/
https://blogs.sap.com/2022/01/27/excel-upload-using-rap-part-2/
https://blogs.sap.com/2022/01/27/excel-upload-using-rap-part-3/
# 1. SAP RAP -> BAS 방법
2023.07.21 - [.SAP/..RAP] - SAP RAP to BAS 연결 정리(BTP)
SAP RAP to BAS 연결 정리(BTP)
SAP RAP -> BAS SAP RAP을 개발하면서 Extension을 해서 CAP으로 넘어가야 하는 상황이 있을 수 있다. 예를 들어서 외부 서비스 연결이나 SAP 연결, API 추가, 복잡한 UI가 필요할 경우 등등... 그러기 위해서
potato98.tistory.com
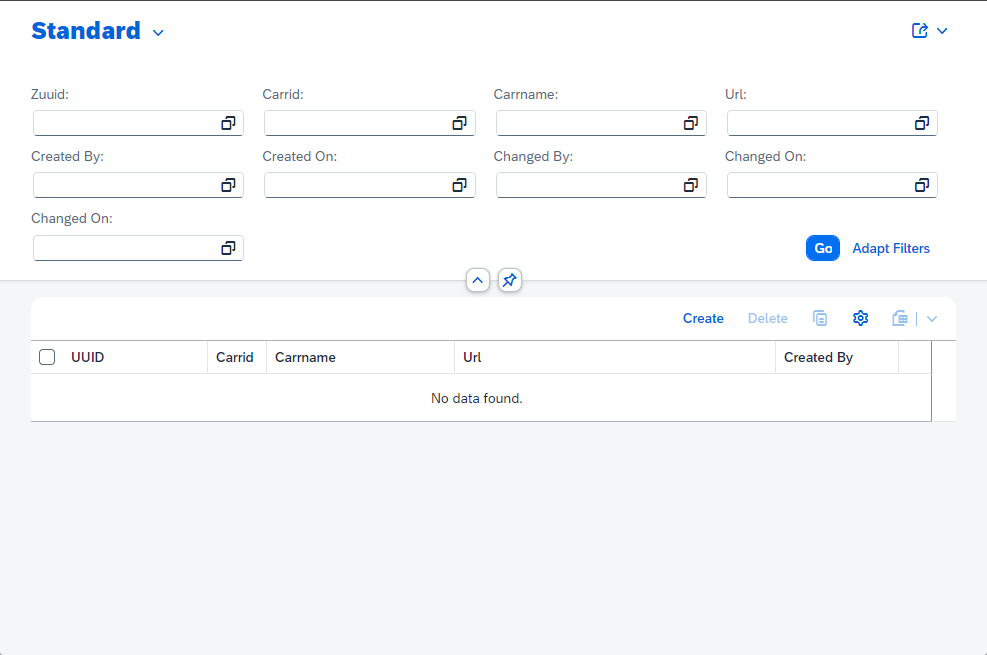
# 여기서는 SCARR_UPLOAD( Odata V2 ) 만들었다.
# 2. SAP BAS 버튼 추가
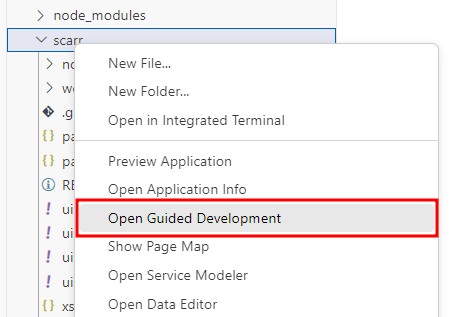
1. 다음과 같이 프로젝트를 만들었을 것이다.
2. 오른쪽 클릭을 한 후, [Open Guided Development] 클릭해 보자.
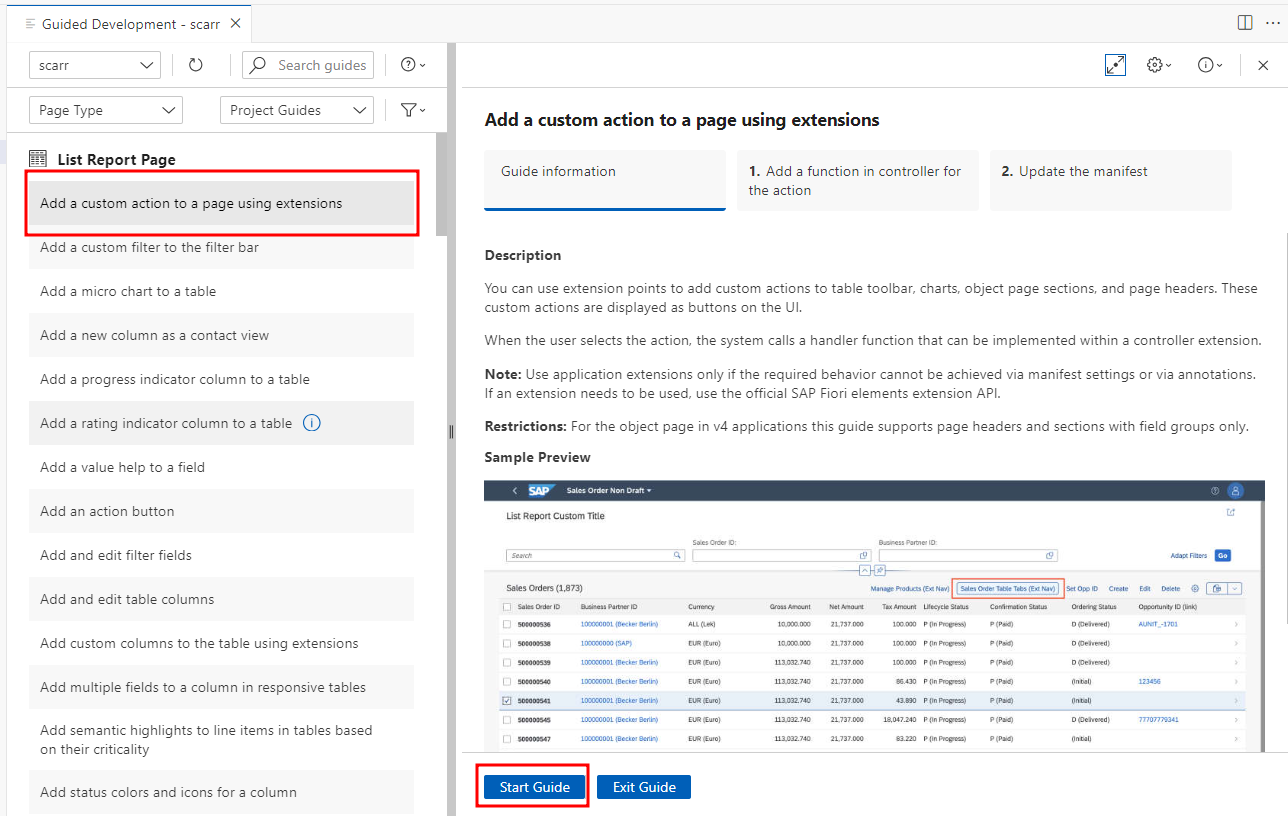
3. [Add. Custom action to a page using extensions] 버튼 클릭.
# 자동으로 버튼을 만들어주는 역할..
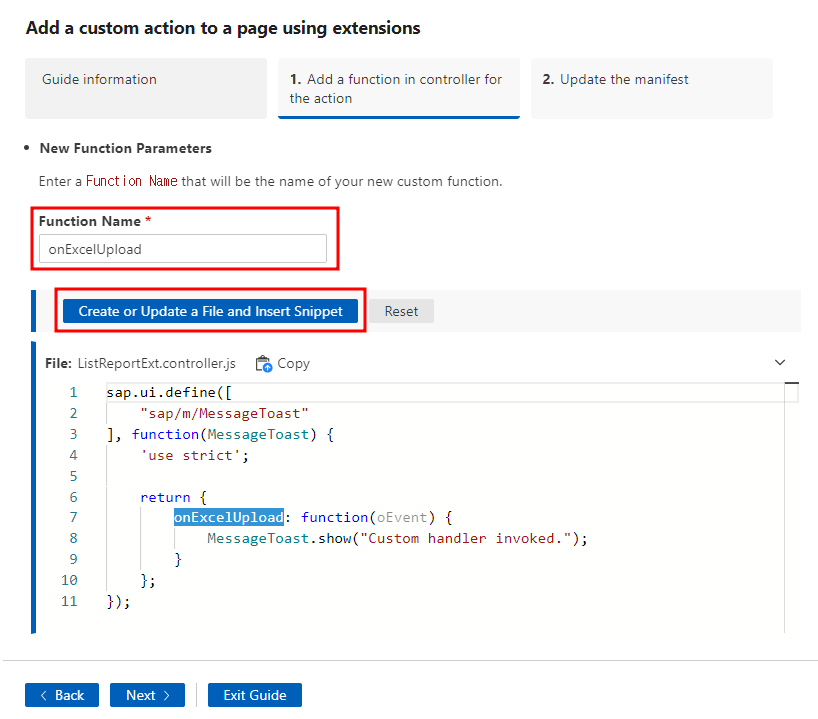
4. Function Name 이름을 넣고 [Create or Upadte a File and Insert Snippet] 클릭
5. 2단계로 넘어가서 다음과 같이 설정하고, [Insert Snippet] 클릭
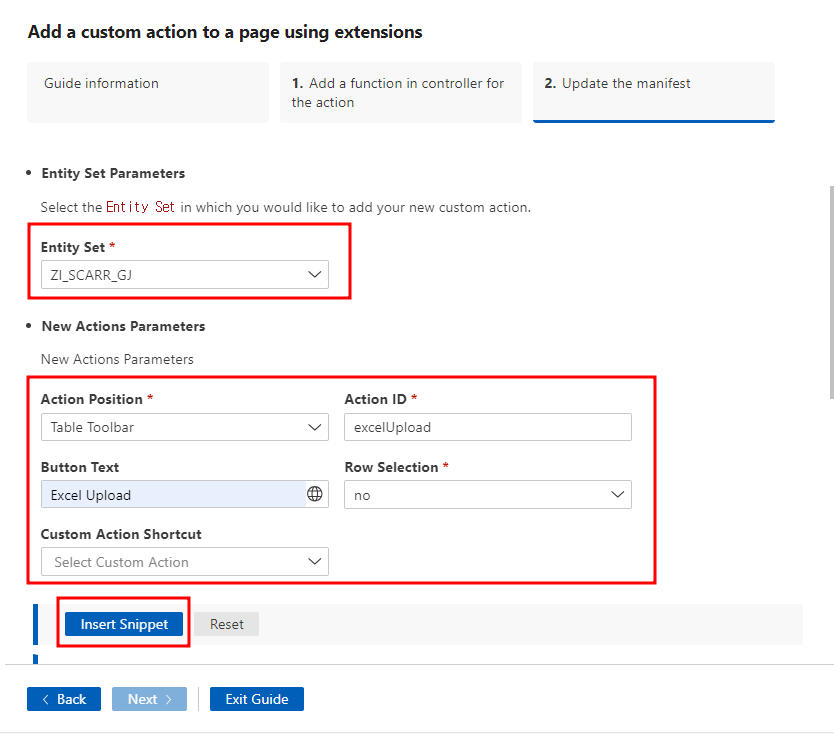
6. 다음과 같이 자동으로 만들어지는 걸 볼 수 있다.
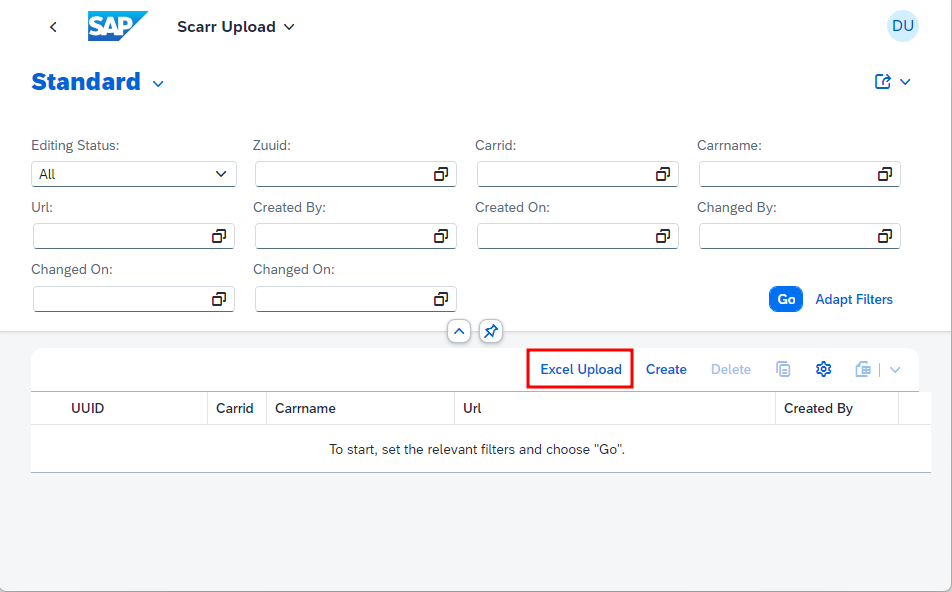
7. 실행시켜 보자.
# 3. XML 추가, Controller 설정
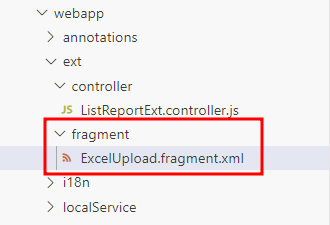
1. 폴더, 파일 생성해 보자.
# [ext] -> [fragment] 폴더 생성
# [fragment] -> ExcelUpload.fragment.xml 파일 생성
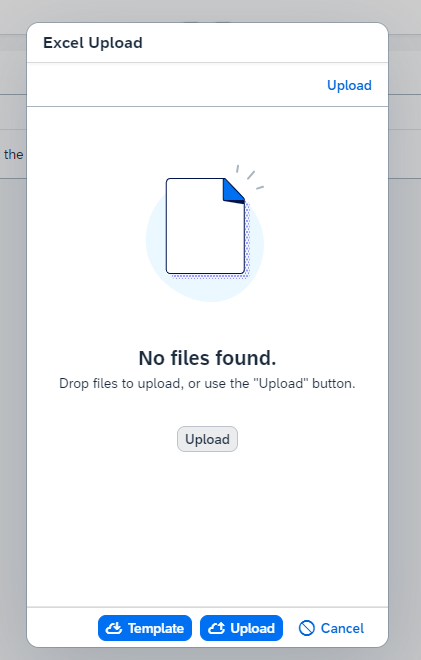
2. ExcelUpload.fragement.xml 파일에 밑에 있는 로직을 복사/붙여놓기 해보자.
<core:FragmentDefinition xmlns="sap.m" xmlns:l="sap.ui.layout" xmlns:core="sap.ui.core" xmlns:u="sap.ui.unified" xmlns:upload="sap.m.upload">
	<Dialog id="uploadDialogSet" title="Excel Upload">
        <content>
            <upload:UploadSet uploadEnabled="true" id="uploadSet" items="{path: '/', templateShareable: false}" fileTypes="xlsx, xls" maxFileNameLength="200" beforeUploadStarts="onBeforeUploadStart" uploadCompleted="onUploadSetComplete" afterItemRemoved="onItemRemoved"
            terminationEnabled="true">
                <upload:UploadSetItem id="_IDGenUploadSetItem1" visibleRemove="true" visibleEdit="false" fileName="{name}" url="/upload">
                    <upload:attributes>
                        <ObjectAttribute id="_IDGenObjectAttribute1" title="Uploaded by" text="{user}" active="false"/>
                    </upload:attributes>
                </upload:UploadSetItem>
            </upload:UploadSet>
        </content>
        <buttons>
            <Button id="_IDGenButton1" text="Template" press="onTempDownload" icon="sap-icon://download-from-cloud" type="Emphasized"/>
            <Button id="_IDGenButton2" text="Upload" press="onUploadSet" icon="sap-icon://upload-to-cloud" type="Emphasized"/>
            <Button id="_IDGenButton3" press="onCloseDialog" text="Cancel" icon="sap-icon://cancel"/>
        </buttons>
        <endButton>
            <Button id="_IDGenButton4" press=".onCloseDialog" text="Ok"/>
        </endButton>
	</Dialog>
</core:FragmentDefinition>
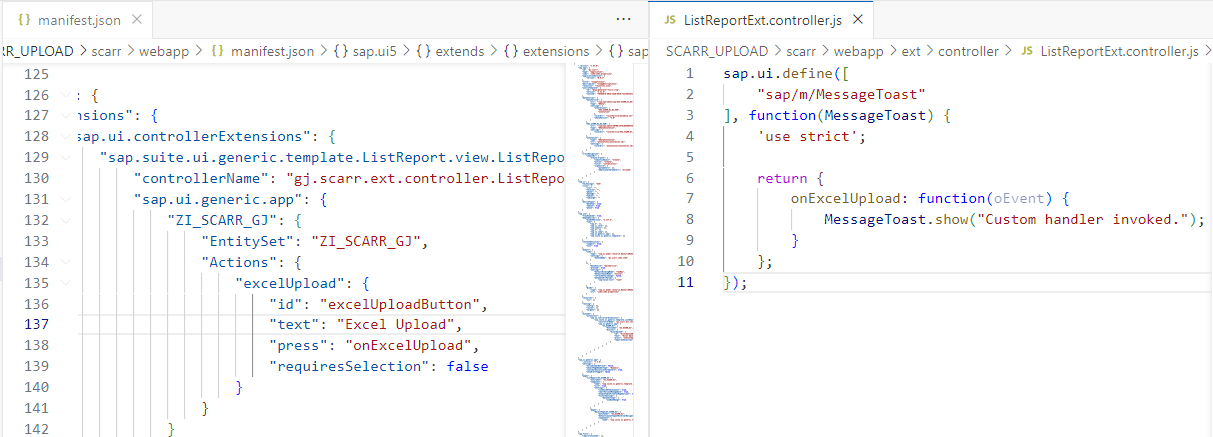
3. 그 다음 ListReportExt.controller.js 파일에 복사/붙여놓기 하자. 여기서 복사/붙여놓기를 잘해야 한다.
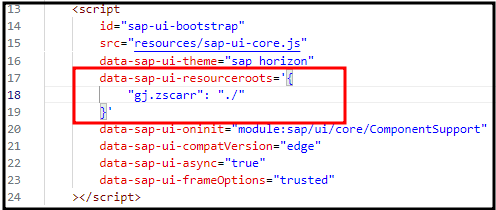
# 또한 파일 경로와 Name 부분을 잘 보아야 한다.
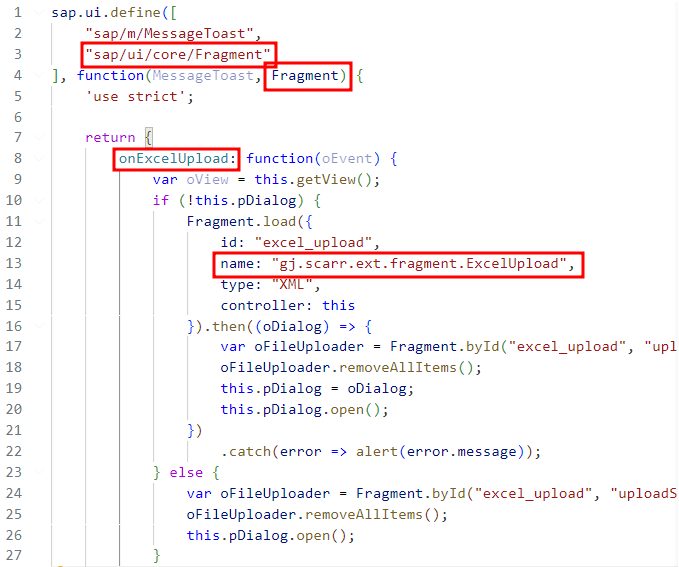
name : 여기서 index.html에서 확인할 수 있다.
sap.ui.define([
    "sap/m/MessageToast",
    "sap/ui/core/Fragment"
], function(MessageToast, Fragment) {
    'use strict';

    return {
        onExcelUpload: function(oEvent) {
            var oView = this.getView();
            if (!this.pDialog) {
                Fragment.load({
                    id: "excel_upload",
                    name: "gj.zscarr.ext.fragment.ExcelUpload",
                    type: "XML",
                    controller: this
                }).then((oDialog) => {
                    var oFileUploader = Fragment.byId("excel_upload", "uploadSet");
                    oFileUploader.removeAllItems();
                    this.pDialog = oDialog;
                    this.pDialog.open();
                })
                    .catch(error => alert(error.message));
            } else {
                var oFileUploader = Fragment.byId("excel_upload", "uploadSet");
                oFileUploader.removeAllItems();
                this.pDialog.open();
            }
        },
        onUploadSet: function(oEvent) {
            console.log("Upload Button Clicked!!!")
            /* TODO: Read excel file data */

        },
        onTempDownload: function (oEvent) {
            console.log("Template Download Button Clicked!!!")
            /* TODO: Excel file template download */
        },
        onCloseDialog: function (oEvent) {
            this.pDialog.close();
        },
        onBeforeUploadStart: function (oEvent) {
            console.log("File Before Upload Event Fired!!!")
            /* TODO: check for file upload count */
        },
        onUploadSetComplete: function (oEvent) {
            console.log("File Uploaded!!!")
            /* TODO: Read excel file data*/
        },
        onItemRemoved:function (oEvent) {
            console.log("File Remove/delete Event Fired!!!")
            /* TODO: Clear the already read excel file data */
        }
    };
});
# 4. NPM 설정
1. 터미널 켜준 후? 밑에 NPM을 Install 하자.
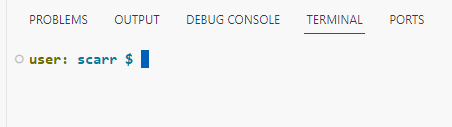
npm i ui5-tooling-modulesnpm i xlsx# 설치를 하는 이유는 JS을 통해서 Excel 파일로 저장 하기 위함
2. 파일 중에 [UI5.Yaml] 파일을 찾아보자.
3. 같은 위치에 다음 값을 넣어주자.
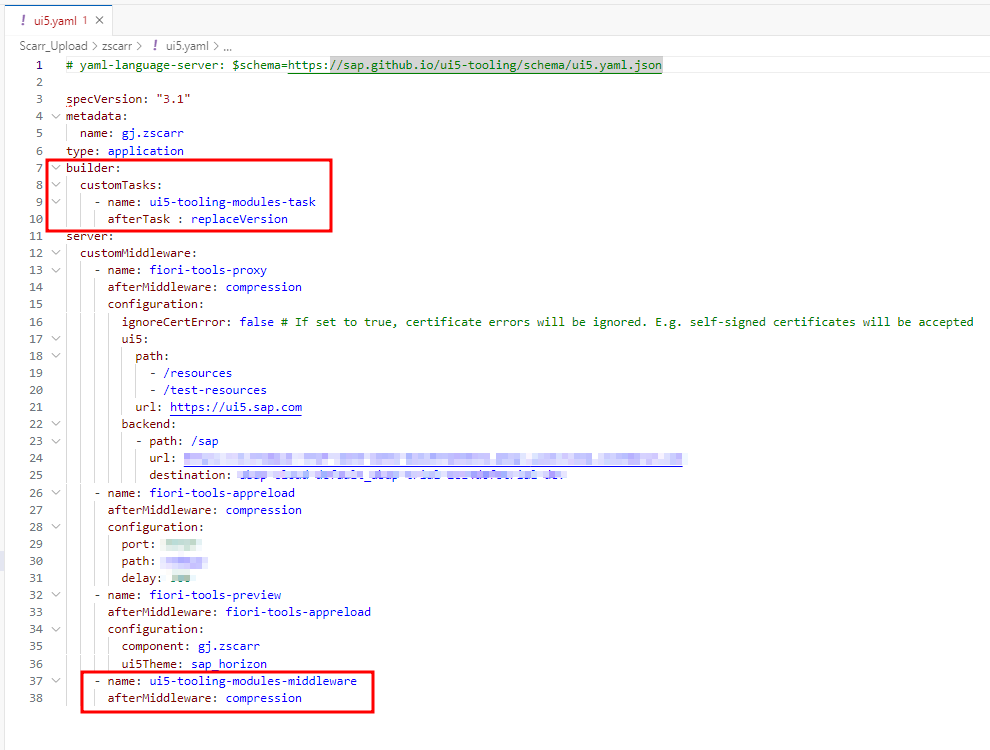
builder:
  customTasks:
    - name: ui5-tooling-modules-task
      afterTask : replaceVersion
- name: ui5-tooling-modules-middleware
afterMiddleware: compression
4. 그 다음 [Packae.Json] 파일로 들어가서 다음과 같이 넣어보자.
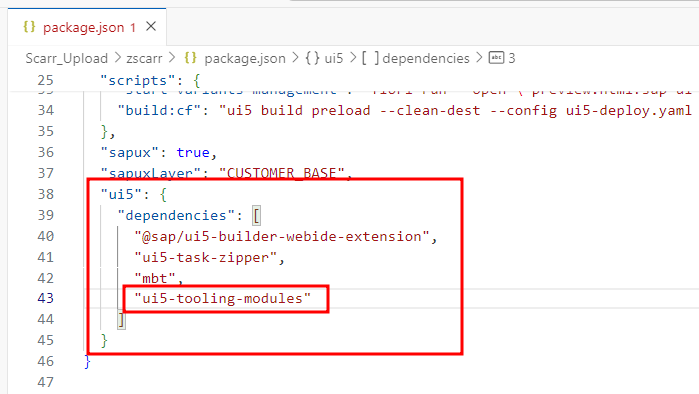
"ui5-tooling-modules"
5. 그리고 실행시켜 보자.
# 5. 다음으로 넘어가 보자.
2024.06.28 - [.SAP/..Cloud ABAP(RAP)] - SAP RAP Excel Upload 정리 #2
SAP RAP Excel Upload 정리 #2
# 01. SAP RAP Excel Upload #1에 대해서 2023.11.16 - [.SAP/..Cloud ABAP(RAP)] - SAP RAP Excel Upload 정리 #1 SAP RAP Excel Upload 정리 #1# 0. Excel Upload 시작하기 전# RAP에서는 Excel Upload을 할 경우에는 Extension을 해야 Excel
potato98.tistory.com
'.SAP > ..Cloud ABAP(RAP)' 카테고리의 다른 글
| SAP RAP Excel Upload 정리 #2 (3) | 2024.06.28 |
|---|---|
| SAP RAP 생성/수정 사항 업데이트하는 방법 (0) | 2023.09.11 |
| SAP RAP Generate ABAP Repository Objects 정리 (2) | 2023.07.22 |
| SAP RAP to BAS 연결 정리(BTP) (0) | 2023.07.21 |
| SAP RAP Side effects 정리 (2) | 2023.07.12 |